Disclaimer: This post contains affiliate links.
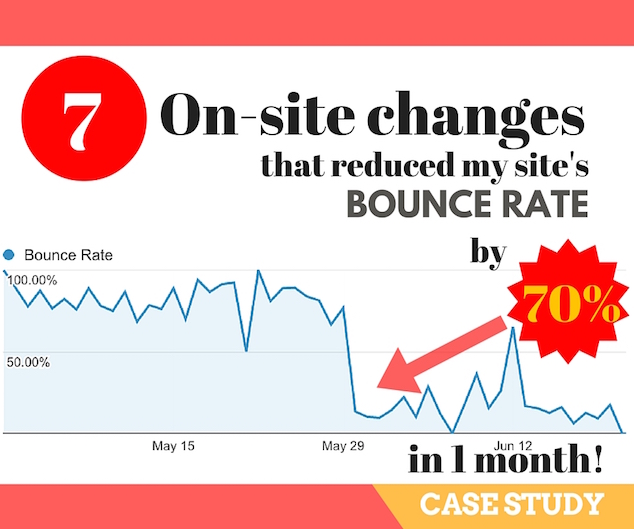
I had achieved a major milestone for my website. I managed to reduce the bounce rate by over 70% in a month by improving the on page SEO. I have shared the screenshot below.

I have a confession to make. Over the past year, I have had a bounce rate on my site that was embarrassing. Since launching my website, I had difficulty retaining visitors on my website and I couldn’t work out how to turn things around.
After doing some more in-depth analysis in the website’s analytics, I discovered that alot of people were leaving the site without even viewing the content. This was alarming!
This was alarming!
To think that potential customers and referrals were leaving the site without even having the opportunity to look at the content was beyond me.
Websites will always have a percentage of people that will leave their site, however we want to minimise that number as much as possible by getting it as close to zero as possible. So I decided to take action with my team and if you read through to the end, you will see what we did to minimise the site’s bounce rate while increasing the site’s engagement.
There is also a bonus cheat sheet for minimising the bounce rate on your website.
Before I get into it, why is it so important to minimise your site’s bounce rate.
- The more engagement you have on your site, the more revenue it should make from the way that you monetise your website.
- The people that never view your content are unlikely to return, potentially costing you thousands of dollars in direct and referral sales.
Therefore, your priority is to lower your site’s bounce rate as much as possible and you can see how I managed to achieve it with the following actions.
A commitment to developing ‘Epic content’.
When I first started publishing the content on this blog, the posts were quite short. I’d describe the value of the content as ‘nice to know’. It wasn’t the type of content that could positively impact the online marketing activities that someone was doing.
I decided to change my approach in November 2015 by publishing detailed posts that were actionable. This change to ‘completely focus on quality and deliver value’ set the tone for my site’s content and would ultimately help to improve my site’s engagement.
Most of the new site content is around 1000 to 2000 words in depth and is supported by illustrative examples in the form of images or video. Additionally, the featured images for each post have been designed to reap the most amount of engagement across the web.
It takes more time to develop these pieces of content, however there’s been a positive impact in terms of time on site and increased visitors to the web content.
Improving the website’s speed.
You could have the most valuable content in the world. But if people cannot see it, then nobody will ever know about it. For a long-time, I was frustrated with the loading speed of my website. I knew that the site would take a while to load and I was hoping that the initial actions that I’d taken would reduce the website’s loading time so that it would be easier for people to access the content.
It wasn’t until I dug deeper into the Google analytics performance where I saw the high bounce rate and decided to fully commit to improving the page loading issue on the site.
The pages on the site had been taking up to 30 seconds to load, which is a time that is far too long. So I decided to take the following actions to make the site’s content load quicker.
Added the image file reduction plugin WP Smush.
You can download this plugin for free from the WordPress plugin repository. Every time you upload your image files to the WordPress, WP Smush will compress those files which will allow the web page to load quicker.
You can download WP Smush here.
Migrated the website’s content to be served from a content management system.
One of the best improvements for improving the speed of the website was from uploading the site’s content to be served from a CDN. There are several providers, however I went with Amazon S3 because they had more global servers and their price was relatively inexpensive. However, I have also heard good things about the other CDN providers below.
- MaxCDN
- Cloudfare
The CDN can also allow browsers to cache your web content so people can access your site’s content quickly.
Implemented Google AMP. (Accelerated Mobile Pages)
I configured the site to use Google AMP through the Yoast plugin on WordPress. Google’s Accelerated Mobile Pages is a new open source project that is being used by some of the world’s leading newspapers and websites. You can read more about the way Google AMP works here.
Click here to find out more about the Google AMP project.
Added the plugin W3 Total Cache (Later updated to WP Rocket)
W3 Total Cache is a WordPress plugin that can help minimise files and configure your WordPress site’s content to be served from a CDN.
You can download the free version of W3 Total Cache here
I later switched to WP Rocket following some positive reviews that I’d seen online. It provides a similar function and should be easy to install, however it also depends on the web theme that you are using.
Optimised the web pages based on the feedback provided by Google Page Speed Insight tool.
Google’s Page Speed Insights tool is a handy way to measure and make improvements to your website’s speed. They provide your website with a score and a traffic light system (Green for good, yellow for OK and red for bad). You can see an illustrative example below.

If there are any issues, they provide suggestions to improve the speed of your website. However, you must ensure that any changes compliment the user experience of the website as well. We made changes where we could. Some of the changes impacted the user experience too much so we had to reverse the actions.
Click here to check your web pages loading time with Google’s Page Speed Insights tool.
I used Pingdom Tools to see which files were taking the longest to load.
Pingdom tools is a great tool that can help you identify those files that are slowing down your site significantly. Once you submit a web page into the tool, it will show you the loading sequence of the content. You can see the loading sequence in the image below.

Some of the issues that were flagged include:
- Slow domain name server response.
- Slow loading images.
- Slow loading from videos.
- Slow loading from the website’s theme.
Click here to check your web page’s loading sequence on Pingdom.
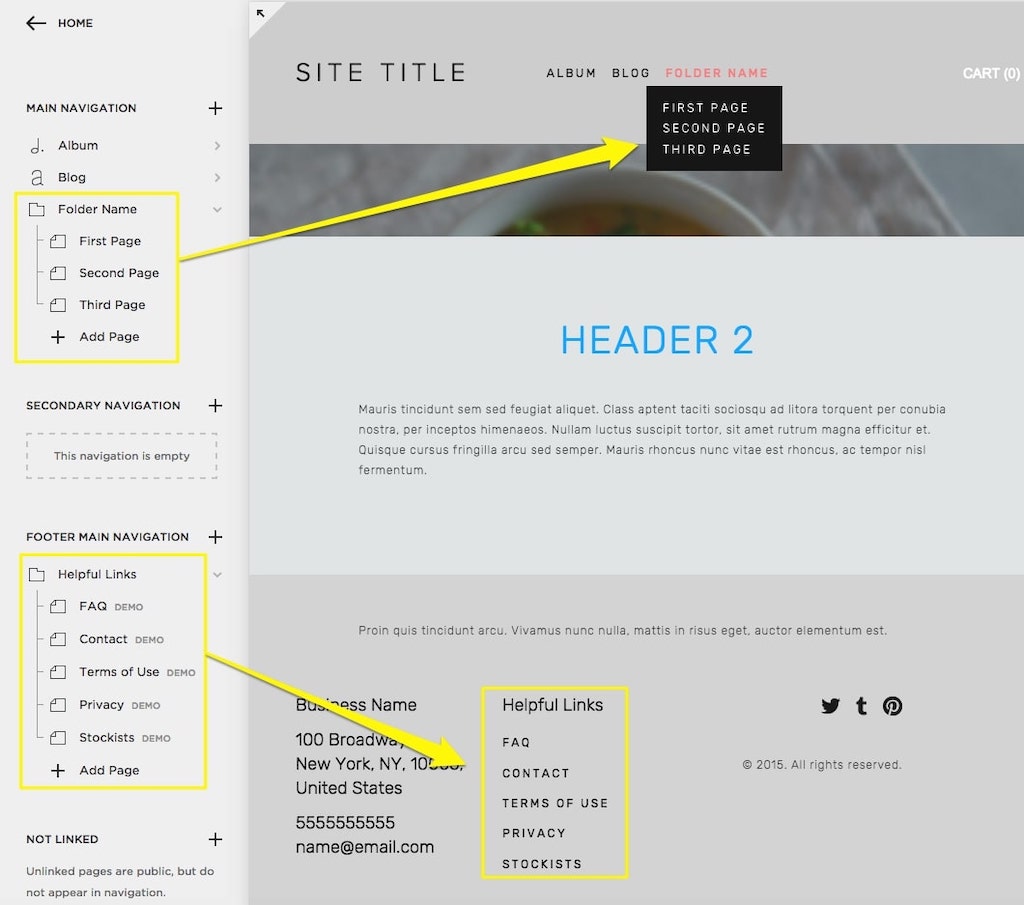
Adding recent posts to the blog’s sidebar.
I want people that visit the website to get incredible value from what they are reading. I decided to add a recent post widget to help improve the site’s engagement and make it easier for people to find what they are looking for.

After adding the widget, the average page views per visit increased.
Have you tried any of the suggestions? Leave your comments in the section below.
Thanks for reading!
Recommended web design resource: Design habits of businesses experiencing hypergrowth
Join the newsletter

Get updates that will allow you to grow your website's income over the next 12 months.


Pingback: The Anatomy of a Perfectly Optimised Landing Page
Pingback: How to do SEO (The Ultimate Guide) - BGDM